
As of the last post in this sew-along, we had a jacket body complete with Upper Collar, Under Collar and Facings. In this post we're going to finish off those sections so they stay put, starting with the Facings.
About halfway down the front edge of your jacket, you'll find a notch. At this notch, clip into the seam allowance of both the Jacket Front and the Front Facing, up to but not through the stitching line. 


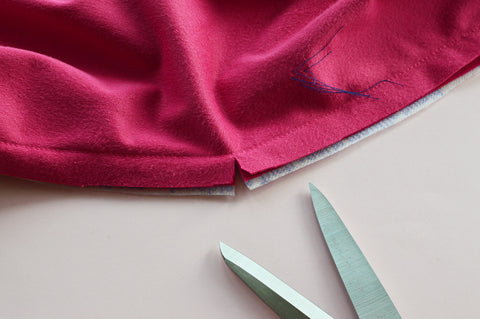
This clip enables you to press the seam allowance above and below in different directions; it is the point at which the Front Facing will fold back and become the jacket's lapel. Below the clip, press the seam allowance into the Front Facing. Above the clip, press the seam allowance into the Jacket Front. Then understitch the seam allowances in place. If your fabric is quite thick, you may want to stop your understitching at a short distance from the clip rather than stitching right up to it, because otherwise when you press the Facing/lapel back you might see a section of understitching because the fold is fatter, if that makes sense. (If you stitch right up to the clip and then later discover you can see some understitching you can of course simply unpick!). 


This separation of the seam allowance and the subsequent understitching should mean that you can now press your lapel back over the jacket, so it finally looks like a completed blazer collar.

We've just one more little thing to tackle before we can move on to our sleeves. You'll perhaps have noticed that at this stage your Collars are still only attached at their outer edges, and therefore the Back Facing is not properly secured to the Jacket. We certainly don't want any elements flapping about, so what we're going to do is stitch together the two seam allowances: from the seam where the Under Collar is joined to the Jacket, and the seam where the Upper Collar is joined to the Back Facing. First, locate these seams and press the seam allowances open. You'll have a sort of bag made of Collars, like in the picture below. 

Bring these two sets of seam allowances together so they are facing each other (as the arrows above indicate), taking care to match the shoulder seams. One half of each (pressed open) seam allowance will disappear inside the 'bag' of the collars. 

Stitch the remaining free halves together as far as you can, either by hand or by machine (taking care that you're only stitching through the seam allowances). This stitching will always be hidden inside the jacket so it doesn't have to be super-neat; its purpose is to keep the Collar anchored. If you're doing it by machine, you'll probably find it easiest to switch to your zipper foot because of the bulk.

Your Collar (now a single entity rather than two) and Back Facing are now firmly secured!

Next blog post will be all about inserting the sleeves into our blazers!
On a little side-note: Being not the most organised of bloggers, I'm writing these posts as we go along, so now in the new reality created by coronavirus. I hope that if you're reading this, wherever you are, that you and your loved ones are well and safe, and that you're not feeling too overwhelmed/anxious. It's a strange time but I will keep blogging and trying to create content across all my channels to connect us and to inspire us all to keep our spirits up through creativity. Nina x